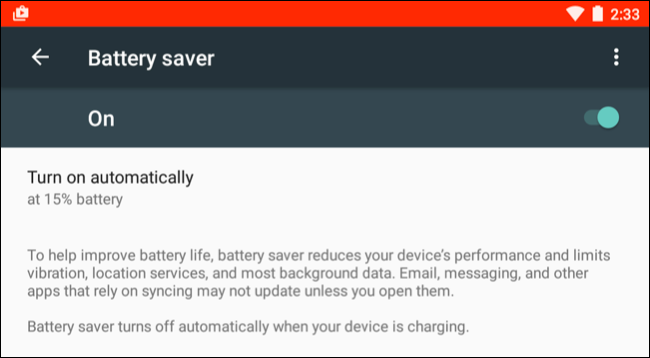
What is Android Battery Saver?
Battery Saver functions similarly to Battery Saver Mode on Windows 10. It’s designed to help stretch your battery life and save you time by automatically performing tweaks you might otherwise perform by hand.
When Battery Saver is enabled, Android will decrease your device’s performance to save battery power, so it’ll perform a bit less quickly but will stay running longer. Your phone or tablet won’t vibrate as much. Location services will also be restricted, so apps won’t use your device’s GPS hardware. This means Google Maps navigation also won’t function. Most background data usage will also be restricted. Email, messaging, and other types of app that rely on receiving new data may not update until you open them.
Battery Saver mode isn’t something you want enabled all of the time. While more battery life sounds great, turning off these features comes with significant downsides. This mode lowers performance, prevents background sync, and limits GPS access. That’s fine if the alternative is your phone dying, but it’s not something you want to deal with all the time–just when you’re really desperate to eke out a bit more battery.
How to Enable Battery Saver Mode
To enable Battery Saver mode or change its settings on an Android device, first head to the Battery screen in the Settings app.
You can do this in a number of ways. For example, you could open the Settings app from the app drawer and tap “Battery.” Or, you could pull down the notification shade from the top of your screen, pull down again to access quick settings, tap the gear icon to open the Settings screen, and tap “Battery.” You could also just tap the battery icon in the quick settings shade to go directly to the Battery screen.

On the Battery screen, tap the menu button and tap “Battery saver.”

To manually enable Battery Saver mode, go to the Battery Saver screen and set the slider to “On.” While in Battery Saver mode, the bars at the top and bottom of your device’s screen will turn red to indicate you’re in Battery saver mode.

The color may look distracting, but it’s designed to quickly communicate to you that your phone is in Battery Saver mode. If your phone or tablet put itself into Battery Saver mode, this means it’s at a low battery level and you’ll want to charge it as soon as possible.
How to automatically enable Battery Saver Mode
You don’t have to enable Battery saver manually. In fact, you generally shouldn’t. Instead, just have Android enable it when you need it.
Tap the “Turn on automatically” option on the Battery Saver screen and you can set Battery Saver mode to turn on automatically “at 15% battery,” “at 5% battery,” or “Never.” Unfortunately, there’s no way to set another battery threshold, so you can’t pick 20% or something else.

When your battery is running low, Battery Saver mode can keep it running longer until you can make it to an outlet and charge it. If you don’t like Battery Saver mode, this is also where you can disable it–set it to “Never” and you’ll never be bugged about Battery Saver mode again unless you visit this screen and enable it by hand.
How to Leave Battery Saver Mode
To leave Battery Saver mode, just plug in your phone or tablet and start charging it. Android will automatically disable Battery Saver mode while charging, and it’ll stay disabled when you unplug your phone.
You can also turn off Battery Saver mode manually. Just pull down your notification shade and tap “Turn Off Battery Saver” in the “Battery saver is on” notification.
You can also visit the Battery Saver screen in settings and set the slider to “Off.”
What If I Don’t Have Battery Saver Mode?
This feature is available on devices running Android 5.0 and later. It’s part of Google’s stock Android, so all devices should include it.
Some manufacturers also offer their own battery saver modes. For example, Samsung offers an “Ultra Power Saving Mode,” HTC offers an “EXTREME Power Saving Mode,” and Sony offers a “STAMINA mode” and “Low battery mode.”
